What is a process model?
A process model describes the flow of work or activities, usually in a graphic format, that contribute to accomplishing a specific goal. Process models are typically used to represent and analyze a series of activities that occur repeatedly and on a regular basis.
Process models can be used to model the flow of work in or between people and departments in an organization, or the flow of activities in a computer system or application.
Process models have a clear beginning and end, intended outcome, order of activities, and different results based on the decisions that you make through the course of the process.
The intent of the model is to provide a representation of the process that allows understanding, analysis, and decisions.
Elements of a Process Model
There are a variety of different notations that can be used when creating a process model. It’s best to keep the notation as simple as possible so you can keep discussions about the model focused on understanding the process you’re modeling, not the symbols you use to model it.
Here is the set of symbols that I have found helpful when modeling processes.
Terminator
Indicates the start or end of the process.
If there is a particular event that triggers a process, you may find it helpful to note that event as you model the process.
When using sticky notes and whiteboards to create a process model, draw the terminator directly on the whiteboard.
Activity
A single step of the overall process that represents a specific task in the overall process. An activity could also represent a subprocess that is described in a different, more detailed process model.
Write a brief description of the activity, preferably in an active voice, and use commonly agreed to terms in the statement.
If you are not using swimlanes in your process model, you may also find it helpful to note who or what performs the activity.
When using sticky notes and whiteboards to create a process model, use 3×3 sticky it notes for activity steps.
Decision

A point where the process can follow one or more paths based on a decision or the application of a particular rule.
Write the decision in the form of a question, where the answers to that question represent the various paths out of the decision.
When using sticky notes and whiteboards to create a process model, turn a 3×3 sticky note 45o to represent the decision.
Arrow

Use arrows to indicate the order of activities and decisions in a process.
When using sticky notes and whiteboards to create a process model, draw arrows on the whiteboard. You may find it helpful to create sticky notes with arrows if you have to revise your process model frequently as you build it.
Connector

A way to indicate a jump from one part of the process to another part to avoid having arrows stretching across the entire process model.
Connectors are usually identified with letters. A connector with an arrow pointing into it represents where you jump from in a process, whereas a connector with an arrow pointing out of it represents where you jump to in that process.
When using sticky notes and whiteboards to create a process model, draw the connectors on the whiteboard directly, usually as you are discussing the flow and you determine that a particular path takes you to a part of the process that already exists.
Swimlanes
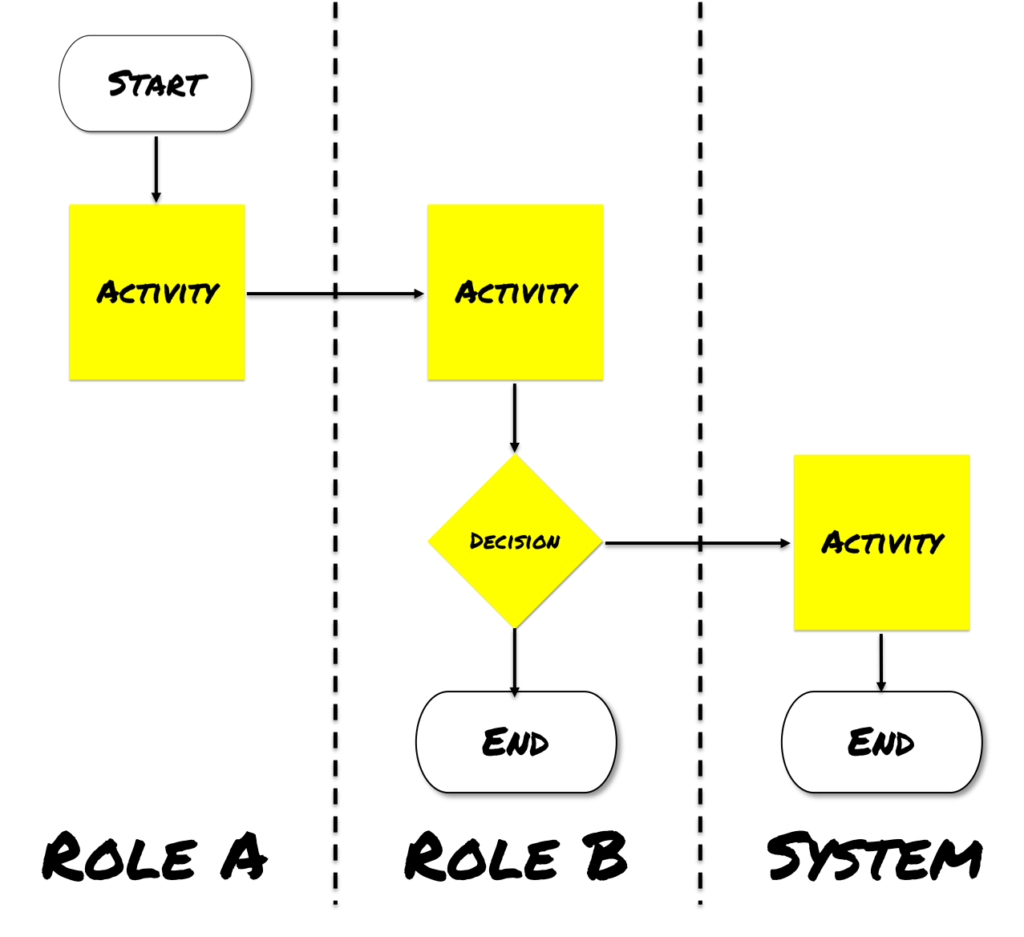
A way to divide up the process flow into specific rows or columns based on who (or what) performs a particular activity or makes a specific decision in a process.
You can draw swimlanes either horizontally or vertically depending on which orientation affords the appropriate amount of space for number of steps in the process compared to the number of roles involved.
When using sticky notes and whiteboards to create a process model, draw the swimlanes on the whiteboard. You may find it helpful to draw the swimlanes before you start modeling the process so you have some guidance where to put the sticky notes representing activities and decisions. If you sense that you may need to change which swimlane represents a particular role, you could use sticky notes to label each swimlane.
Other Symbols
I’ve found the above notation sufficient for when I’ve modeled processes, but you may find it helpful to have additional symbols for things such as inputs, outputs, documents, and data storage. There are common symbols that you can use to represent those different concepts. You can also chose to use different colored sticky notes if you are mapping the process with sticky notes and a whiteboard.
When deciding whether to use additional symbols, be sure to use those different symbols consistently and make sure the value of using the unique symbol outweighs the potential for confusion from people trying to understand your process model.
Also Known as
There are a variety of techniques you can use to model and represent a process:
- process map
- process diagram
- flowchart
- SIPOC (Supplier, Input, Process, Output, Consumer)
- value stream map
- workflow diagram
- activity diagram
Each of these techniques have specific purposes and there may be times where it is important to use a specific technique.
Generally speaking when you are trying to build shared understanding, a flowchart can be sufficient, and that is the technique assumed in this technique brief.
An Example
Here is an example of a process model (in addition to a user interface mockup and report mockup) that were created on during a discussion to understand the process for submitting a session proposal.
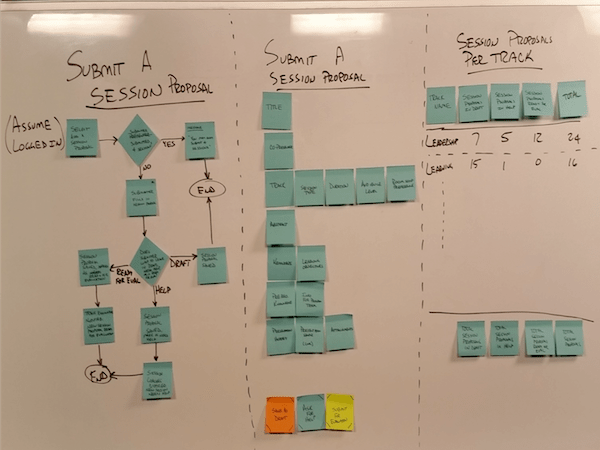
You’ll find it’s often helpful to create multiple models simultaneously when trying to build shared understanding about a process.
When to use a process model
You may find creating a process model in a collaborative manner helpful in the following situations:
- When you want to build a shared understanding of an existing business process
- When your team wants to figure out how to deliver the functionality necessary to support a new or changing business process.
- When you are having a discussion about a process and you’d like to aid the conversation.
- When you want to improve a process. Creating a process model gives you a starting point for looking at the process and identifying opportunities for improvement.
You will usually model a process as part of creating your initial backlog or starting work on a significant portion of a product or project. The process models you create often form a “big picture” view of your overall initiative, especially when that initiative is focused on supporting a new or changing business process. In this case you may find several backlog items referencing a single process mdoel.
In some limited cases you may also use a process model to build understanding of a particular backlog item, though this use of a process model is somewhat rare.
Why use a process model
The biggest benefit out of using a process model to help you build and maintain a shared understanding is that it leverages the idea that a picture is worth a thousand words. It’s easier to grasp how a process works when you can see it depicted graphically versus talking about it in vague terms or trying to describe it in text.
Furthermore, you want to develop your process models in a collaborative manner because the discussions that occur as you build the model lead to more concrete understanding.
You also experience the benefits of collaborative modeling in general as described in the collaborative modeling technique brief.
How to use a process model
In addition to the process modeling steps below, you may also want to refer to the collaborative modeling technique brief for instructions on how to perform collaborative modeling in general.
Create process model
- Identify the process you want to model and why. In some cases your initiative is focused on improving a specific process (in which case identifying the process in question is easy). In other cases, you’re trying to reach a specific outcome and you may need to create a process in order to deliver that outcome. In still other cases, you’re setting out to solve a problem and you’re not sure which process needs to be revised in order to deliver a solution. Being explicit about the process you want to address will help bring clarity to your efforts.
- Identify the right people to include in the discussion. This includes people who will be involved in the business process and therefore understand the specifics of the process, and the people who are going to build something to support that business process. You may also want to identify the people who don’t fit either of those categories but may be tangentially involved in the overall effort and include a couple of people with this perspective as well.
- Gather these individuals together at a whiteboard and get plenty of sticky notes. You want to be able to build the model as you discuss things and change the model as you work through the process and uncover information you didn’t know at the beginning of your discussion. You will change things, and that’s ok. It’s the act of talking through the process that helps people build an understanding and think of things that they didn’t realize at the start of the conversation.
- Name your process. If you’re working with an existing process, identify all the various ways the process is referred to and identify a consistent name going forward. If you are creating a new process create a name and consistently use that name. The clearest process names start with a verb (for example Submit Session Proposal or Adjudicate Claim). The more specific and action oriented the name, the easier it is to keep people focused on the proper scope.
- Determine if you need to model both current state and future state, or just future state. When you are changing an existing process, you’ll want to start with the current state of the process. You’ll want to model how it currently works in reality, not how people think it should work, or how it’s written up in procedures and work instructions. Those differences between expectations and reality can help you to identify opportunities for improvement. On the other hand, if it’s a brand new process, you may not have a current state to map. Either way, having the explicit discussion about whether you are modeling current state or future state helps to bring clarity to the discussion.
- Identify a clear start point and end point for the process. Explicit starting and ending points help you to keep the scope of your discussions contained. Identify what must be true in order for the process to start (pre conditions) and what conditions need to be in place to consider a process successfully completed (post conditions). You may also want to determine if there are certain activities that trigger the start of a process.
- Chose the most common path through the process and identify the actions and decisions that occur. Select a scenario relevant for the process and talk through that scenario with the group identifying the key actions and decisions along the way. For your first scenario, select something that is both common and fairly simple. This helps to make sure you capture the key activities of the process and provides you a structure to build on when you start discussing less common edge cases. During this discussion you will most likely need to keep the group focused on the specific scenario you are discussing. If people bring up different scenarios note them somewhere so that you can come back to them, but stay focused on the desired flow. Whenever possible, find an actual example you can use to walk through the process.
- Walk different scenarios through the process and adjust the process accordingly. Once you’ve walked through the most common scenario, identify other scenarios to walk through the process and make adjustments to the process model based on those new scenarios. Usually different scenarios drive new decision points, or additional paths off existing decisions. Repeat this step for the different scenarios your team has identified.
- Identify examples to test (and potentially break) the model. Select a couple of examples to walk through the process. On the surface, these examples may represent one of the scenarios you had already identified, or it may represent a slight variant. The goal here is to test how robust the model is for dealing with real life scenarios and identifying gaps or assumptions that may exist in your process. If you identify an issue with your process model, revise accordingly.
- Capture your process model with a picture. When your discussion is at a stopping point, take pictures of your process model and distribute them to the group. If possible, retain the actual model on the whiteboard so that you can have future discussions and revisit the model if new information emerges that requires you to revise the model. If there were people who were not able to join the discussion, review the process model with them (preferably in person at the whiteboard, but at least using the pictures). These discussions may reveal new information that drives revisions to your process model.
Use a process model to identify backlog items
You can use the process model you created to provide a “big picture” view of your initiative and identify backlog items needed to support the process. This exercise can be done at the same time you model the process, or shortly thereafter, depending on how much time you have available.
- Get the right people back together. Include the same people who created the process model.
- Identify backlog items. Provide the group with sticky notes, preferably a different color than what you used to create the process model. Ask the group to identify backlog items needed in order to make the process a reality. In some cases, the backlog item is directly associated to a particular activity in the process, in which case you can use the same phrase to describe both. In other situations, a backlog item may be a particular path through the process in order to support a given scenario. In those cases, describe the backlog item in terms of the relevant scenario. Have people place the sticky notes on the appropriate location on the process model. This helps to place the backlog items in the bigger context.
- Review the backlog items. Once your team has identified potential backlog items, ask the team to walk the model and see if there’s anything they think is missing or if they have questions on anything. Have the appropriate discussions and add backlog items that seem to be missing.
- Identify the backlog items that help you reach a specific outcome. Identify a specific outcome that you want to accomplish, most likely an interim step to your overall outcome. Have the team identify the specific backlog items that are absolutely essential to arriving at that outcome with a colored dot or a specifically colored marker. This step allows you to focus on only the backlog items that are essential to accomplishing your desired outcome. A good criteria for your initial pass at identifying backlog items may be only those items required to support the most common scenario you had in mind first when modeling the process. If you have a specific set of outcomes that you would like to deliver incrementally, repeat this step for each outcome.
Caveats and Considerations
Process modelling is not necessary, or useful for all situations. It’s especially helpful in cases where you’re building support for a specific business process. It may not be as useful for cases where you are primarily collecting or providing data, but there aren’t a large number of steps or decisions required to make that happen. In those cases, user interface mockups or report mockups may be more useful.
This technique brief provided a minimal set of simple symbols to use when modeling your process. You can use a broader notation if you want to, just make sure you use all the notation consistently and ensure the benefits you get from using specialized notation outweigh the extra time required to ensure consistent use and the potential for confusion from people using the model that aren’t familiar with the notation.
Don’t feel the need to use an electronic tool to create the process model if you don’t need to. Sometimes the hand drawn variety can be more useful. It depends somewhat on what your intended use of the process model is. The collaborative by hand approach described in this technique brief is based on the idea that there is often more value in the discussions you have when creating the process model than in the model itself.
Resources
The How (and Why) of User Flows
A user flow is a series of steps a user takes to achieve a meaningful goal. It shows the path a user takes through the product as they complete a specific task. It has things like a title, wireframes, and notes in a flow chart. You can think of a user flow as a solution focused version of a process model.
Additional Resources
All about business process mapping, flow charts, and diagrams – Lucidchart
What is a Process Flowchart – ASQ
A Complete Breakdown for Business Process Analysis – KiSSFLOW
How to analyze a business process? – Capstera
How to Diagram a Workflow – Laura Brandenburg, Bridging the Gap
Improving Business Processes – Mindtools
How to analyze a business process – Wiki How